Scalar API Reference 는 Swagger UI를 대체할 수 있는 또다른 API 문서화 방법이다.
Swagger UI와 비교하였을 때 화면 구성이 깔끔하기도 하며 API를 호출할 때 Postman과 같은 편리한 UI를 제공해줘서 개인적으로는 Swagger UI의 대체제로써 훌륭한 선택이라는 생각이다.

이번 포스팅에서는 Spring Web MVC 프로젝트에서 Scalar API Reference를 사용하는 방법에 대해 알아보도록 하겠다.
(코드 예제는 여기에서 확인할 수 있다)
0. Scalar Quickstart 살펴보기
먼저 어떻게 Scalar API Reference를 사용하면 좋을지를 알아보기 위해
Scalar repository README에 있는 Quckstart를 살펴보자.
<!doctype html>
<html>
  <head>
    <title>Scalar API Reference</title>
    <meta charset="utf-8" />
    <meta
      name="viewport"
      content="width=device-width, initial-scale=1" />
  </head>
  <body>
    <!-- Need a Custom Header? Check out this example https://codepen.io/scalarorg/pen/VwOXqam -->
    <script
      id="api-reference"
      data-url="https://cdn.jsdelivr.net/npm/@scalar/galaxy/dist/latest.json"></script>
    <script src="https://cdn.jsdelivr.net/npm/@scalar/api-reference"></script>
  </body>
</html>
README에 위와 같은 짧은 html 코드가 있는데 이를 웹 브라우저에서 실행해보면 아래와 같은 API 문서가 나온다.

어떻게 이러한 문서가 나오게 되는걸까?
HTML의 14번째 줄을 보면 data-url에 json 파일을 사용하고 있는 걸 볼 수 있는데 이는 OpenAPI spec이다.
<!doctype html>
<html>
  <head>
    <title>Scalar API Reference</title>
    <meta charset="utf-8" />
    <meta
      name="viewport"
      content="width=device-width, initial-scale=1" />
  </head>
  <body>
    <!-- Need a Custom Header? Check out this example https://codepen.io/scalarorg/pen/VwOXqam -->
    <script
      id="api-reference"
      data-url="https://cdn.jsdelivr.net/npm/@scalar/galaxy/dist/latest.json"></script>
    <script src="https://cdn.jsdelivr.net/npm/@scalar/api-reference"></script>
  </body>
</html>

즉, OpenAPI spec 경로를 사용하여 15번째 라인의 스크립트를 통해 API 문서가 생성되는 것이다.
Scalar API Reference 위해서는 API의 OpenAPI spec를 가져올 수 있으면 된다.
이제 어떻게 Scalar API Reference를 사용할 수 있는지를 알아보았으니 Spring Web MVC프로젝트에서 Scalar API Reference를 어떻게 셋업할지 대해 살펴보자.
1. springdoc-openapi를 통해 OpenAPI spec 생성하기
Spring에서 OpenAPI spec을 만들고 Swagger UI를 실행하는 라이브러리로 가장 많이 사용되는 것이 springdoc-openapi 이다.
springdoc-openapi를 사용하기 위해 의존성을 추가해준다.
// build.gradle.kts
dependencies {
    implementation("org.springdoc:springdoc-openapi-starter-webmvc-ui:2.6.0")
}
springdoc-openapi starter의 경우 기본적으로 /v3/api-docs를 통해 OpenAPI spec을 생성하게 된다.
서버를 실행한 뒤, /v3/api-docs 경로로 접속해보자.

이렇게 OpenAPI spec을 만드는 설정은 application.yml에서 켜고 끌 수 있다.
Scalar API Reference를 사용하기 위해서는 이 spec이 필요하기 때문에 이 설정은 기본값인 true로 두어야한다.
springdoc:
  api-docs:
    enabled: true # <===
2. API (Controller) 추가
API의 OpenAPI spec을 생성하는 설정을 마쳤기 때문에 예제를 위해 Controller를 생성하여 API를 추가해보자.
여기에서 API의 produces 옵션을 설정해줘야지 Scalar API Reference 상에서 응답 예제가 나오므로 더 명확한 문서를 위해 produces 옵션을 추가해주는 것을 추천한다..
// com.tistory.devs0n.scalar.UserController.kt
package com.tistory.devs0n.scalar

import io.swagger.v3.oas.annotations.Operation
import io.swagger.v3.oas.annotations.media.Schema
import io.swagger.v3.oas.annotations.tags.Tag
import org.springframework.http.MediaType
import org.springframework.web.bind.annotation.*

@Tag(name = "User API")
@RestController
@RequestMapping("/api/users")
class UserController {
    private val users = mutableListOf(
        User(name = "Kim", country = "Korea", city = "Seoul"),
        User(name = "James", country = "USA", city = "New York"),
        User(name = "Chris", country = "Korea", city = "Incheon"),
    )

    @Operation(description = "사용자 조회")
    @GetMapping(produces = [MediaType.APPLICATION_JSON_VALUE]) // `produces` 설정을 해야 응답 예제가 나옴
    fun getUsers(
        @RequestParam(required = false) country: String?,
        @RequestParam(required = false) name: String?,
    ): List<User> {
        var response: List<User> = this.users

        if (country != null) {
            response = response.filter { it.country == country }
        }

        if (name != null) {
            response = response.filter { it.name == name }
        }

        return response
    }

    @Operation(description = "사용자 추가")
    @PostMapping(produces = [MediaType.APPLICATION_JSON_VALUE])
    fun addUser(@RequestBody request: User): User {
        this.users.add(request)
        return request
    }
}

@Schema(description = "사용자 정보")
data class User(
    @Schema(description = "이름", example = "Lee")
    val name: String,
    @Schema(description = "국가", example = "Korea")
    val country: String,
    @Schema(description = "도시", example = "Seoul")
    val city: String,
)
// com.tistory.devs0n.scalar.ProductController
package com.tistory.devs0n.scalar

import io.swagger.v3.oas.annotations.Operation
import io.swagger.v3.oas.annotations.media.Schema
import io.swagger.v3.oas.annotations.tags.Tag
import org.springframework.http.MediaType
import org.springframework.web.bind.annotation.*

@Tag(name = "Product API")
@RestController
@RequestMapping("/api/products")
class ProductController {
    private val products = mutableListOf(
        Product(name = "Jeans", price = 55_000),
        Product(name = "T-shirt", price = 24_500),
    )

    @Operation(description = "제품 조회")
    @GetMapping(produces = [MediaType.APPLICATION_JSON_VALUE]) // `produces` 설정을 해야 응답 예제가 나옴
    fun getProducts(): List<Product> {
        return this.products
    }

    @Operation(description = "제품 추가")
    @PostMapping(produces = [MediaType.APPLICATION_JSON_VALUE])
    fun addProduct(@RequestBody request: Product): Product {
        this.products.add(request)
        return request
    }
}

@Schema(description = "제품 정보")
data class Product(
    @Schema(description = "제품명", example = "Jeans")
    val name: String,
    @Schema(description = "가격", example = "55_000")
    val price: Int,
)
그리고 다시 /v3/api-docs 경로를 확인해보면 OpenAPI spec에 새로 추가한 API에 대한 정보가 추가된 것을 확인할 수 있다.

3. Scalar API Reference 사용을 위한 html 추가
API의 OpenAPI spec을 가져올 수 있기 때문에 이를 사용하기만 하면 된다.
앞서 살펴본 html 파일에서 data-url 옵션만 /v3/api-docs로 변경해준 html 파일을 resources 디렉토리에 추가해준다.
<!doctype html>
<html>
<head>
    <title>Scalar API Reference</title>
    <meta charset="utf-8" />
    <meta
            name="viewport"
            content="width=device-width, initial-scale=1" />
</head>
<body>
<script id="api-reference" data-url="/v3/api-docs"></script>
<script src="https://cdn.jsdelivr.net/npm/@scalar/api-reference"></script>
</body>
</html>

(나의 경우 resources/static/api-spec/index.html 에 두었다)
이제 서버를 실행한 뒤에 저장한 html 파일 경로에 맞는 url에 접속해서 문서를 확인해보자.
(나의 경우 /api-spec/index.html)

API 문서가 잘 생성되었음을 확인할 수 있고 API를 호출하는 것 또한 잘 동작하는 것을 볼 수 있다.

4. Authorization 추가
JWT와 같이 요청 header에 인증 정보를 추가해야하는 경우가 있다.
Authorization 설정을 추가해보고 Scalar API Reference에서는 어떤 식으로 사용되는지 알아보자.
먼저 OpenAPI 설정 코드를 추가한다.
// com.tistory.devs0n.scalar.OpenAPIConfiguration.kt
package com.tistory.devs0n.scalar

import io.swagger.v3.oas.models.Components
import io.swagger.v3.oas.models.OpenAPI
import io.swagger.v3.oas.models.info.Info
import io.swagger.v3.oas.models.security.SecurityRequirement
import io.swagger.v3.oas.models.security.SecurityScheme
import org.springframework.context.annotation.Bean
import org.springframework.context.annotation.Configuration

@Configuration
class OpenAPIConfiguration {
    @Bean
    fun openApi(): OpenAPI {
        return OpenAPI()
            .info(Info().title("Scalar API Reference example API"))
            .components(
                Components().addSecuritySchemes(
                    "Access Token",
                    SecurityScheme()
                        .type(SecurityScheme.Type.HTTP)
                        .`in`(SecurityScheme.In.HEADER)
                        .name("Authorization")
                        .scheme("bearer")
                        .bearerFormat("JWT")

                )
            )
            .addSecurityItem(
                SecurityRequirement()
                    .addList("Access Token")
            )
    }
}
그리고 서버를 재실행 후 API 문서를 다시 보면 인증 토큰을 설정하는 란이 생긴 것을 확인할 수 있다.

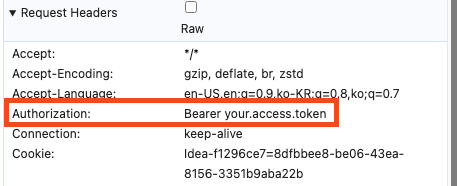
API를 호출하는 창에서 인증 토큰을 그대로 사용하는 것을 확인할 수 있고 실제 요청 header에도 인증 토큰이 잘 전송되는 것을 볼 수 있다.

'Java & Kotlin > Spring' 카테고리의 다른 글
| Spring graceful shutdown (+ async, virtual thread) (1) | 2025.03.09 |
|---|---|
| Kotlin SpringBoot 환경에서 jOOQ 설정 (2) | 2024.12.03 |
| [Spring Data JPA] @OneToMany Entity 연관 관계에 대하여 (7) | 2023.01.20 |
| [Spring Data JPA] entity update 후 JpaRepository.save 호출에 관하여 (6) | 2023.01.09 |
| [springdoc-openapi] 고정 header 설정하기 (0) | 2022.12.31 |


댓글