Java나 Kotlin을 사용할 때 Gradle을 사용하면 모듈형 아키텍처를 적용하는 것이 그리 어렵지 않다.
(하지만 자세하게 설정하려고하면 Gradle을 잘 모르고서는 어렵다 👀 )
이번 포스팅에서는 아래와 같이 2개의 모듈로 구성된 단순한 프로젝트를 만들며
Kotlin을 사용하면서 Gradle Multi Module을 적용하는 방법에 대해 알아보도록 하자

예제는 여기에서 확인할 수 있다.
root 프로젝트
프로젝트 생성
먼저 모듈의 root가 되는 Gradle 프로젝트를 생성하자.
아래와 같이 Kotlin 설정을 한 뒤 프로젝트 GroupId, ArtifactId 등을 설정한 후 프로젝트를 생성한다.
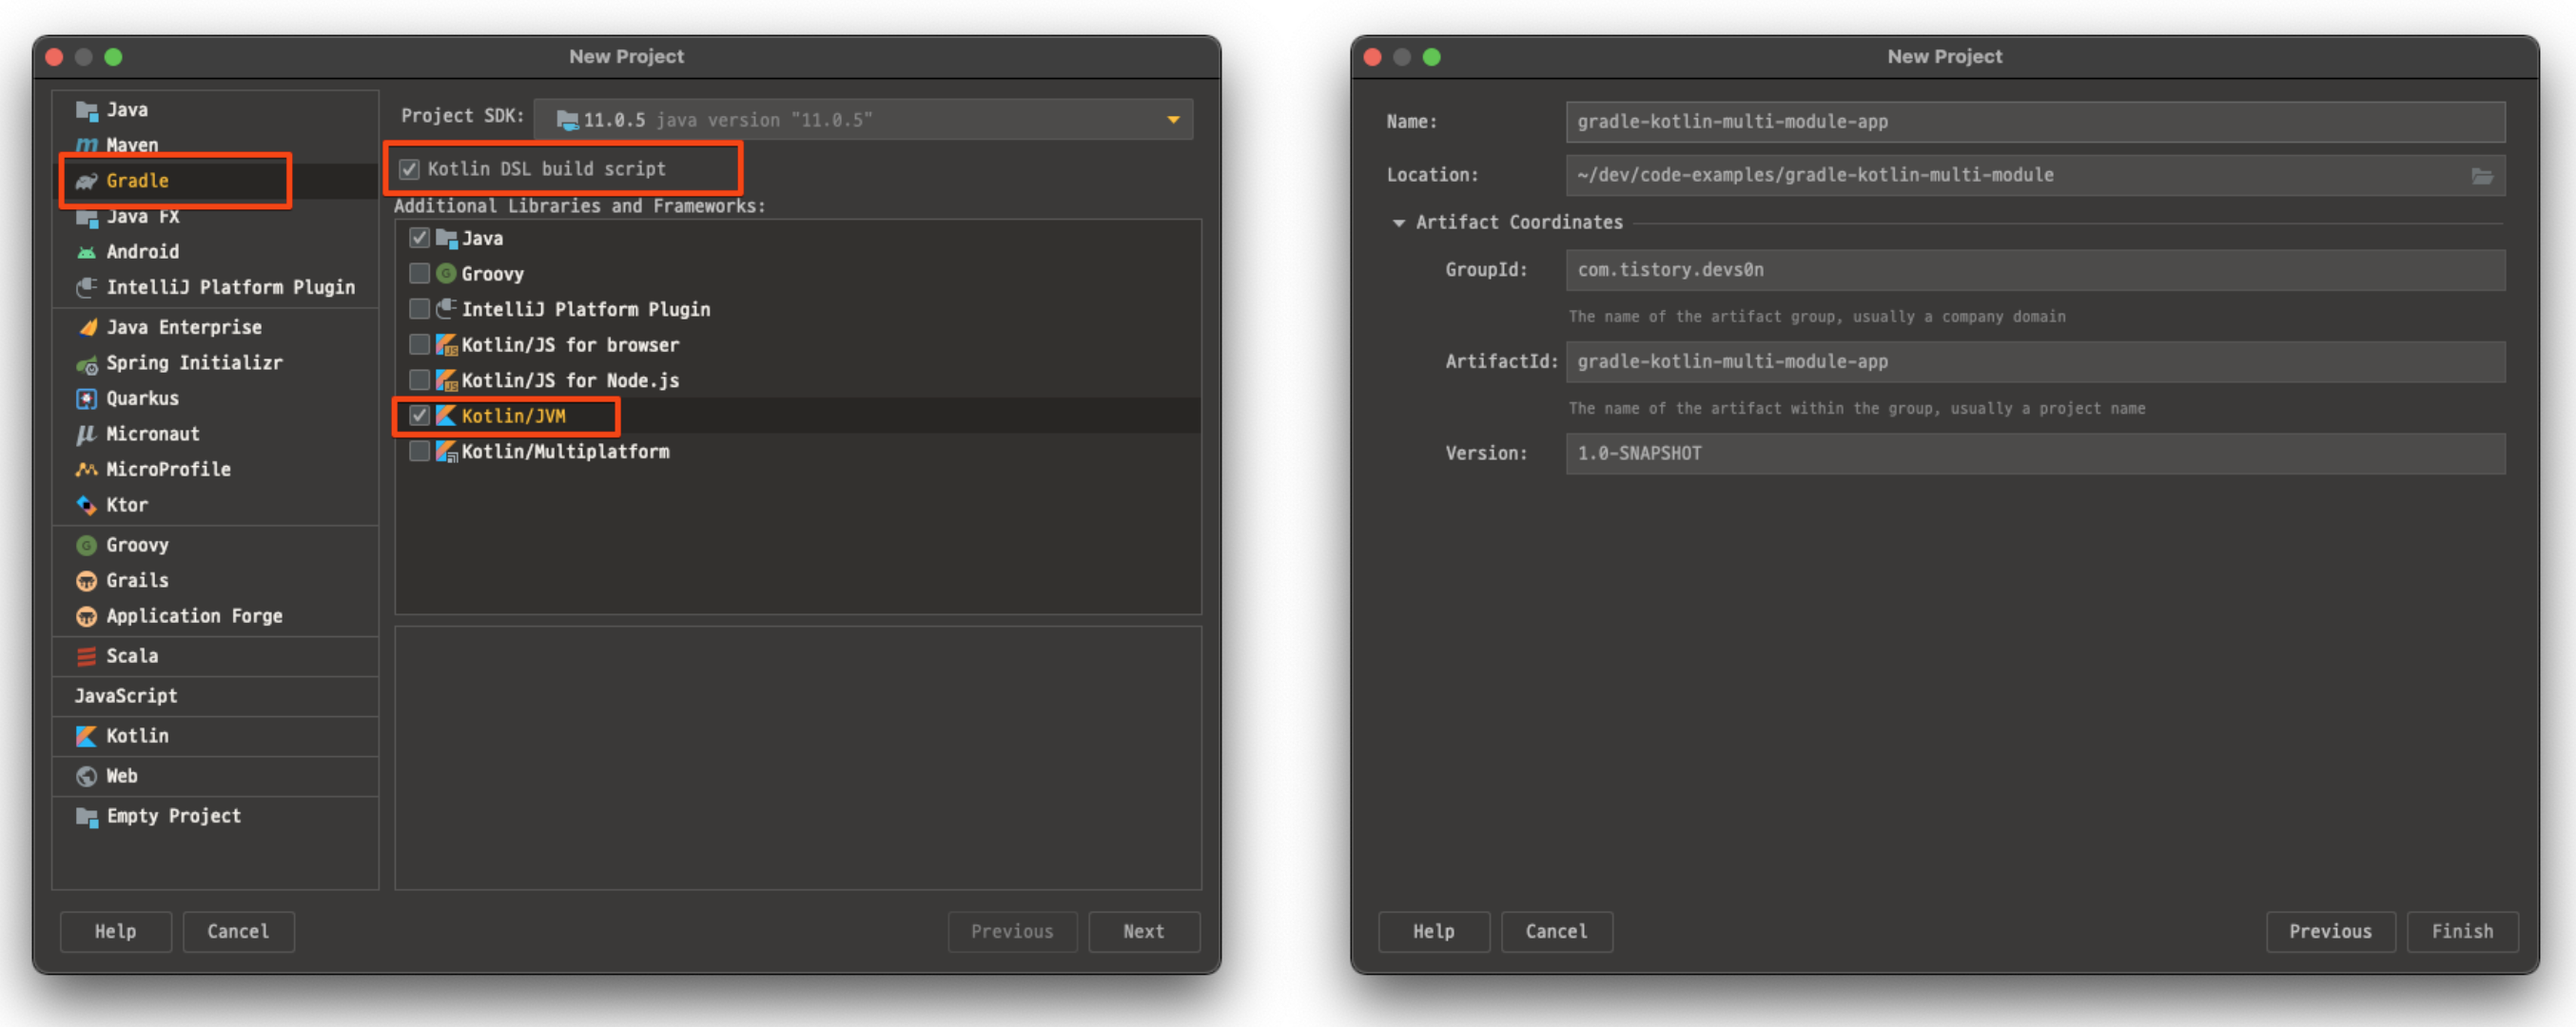
불필요한 파일 삭제
root project에 소스코드는 필요하지 않기 때문에 없애도록 한다.

모듈 추가
이제 프로젝트에서 사용할 모듈을 추가해보자.
먼저 모듈을 하나 만들고 Gradle 설정을 손보고 난 뒤 다른 모듈을 추가하는 식으로 진행하겠다.
utils 모듈 추가
IntelliJ IDE를 통해 새로운 Gradle 모듈을 추가하자.
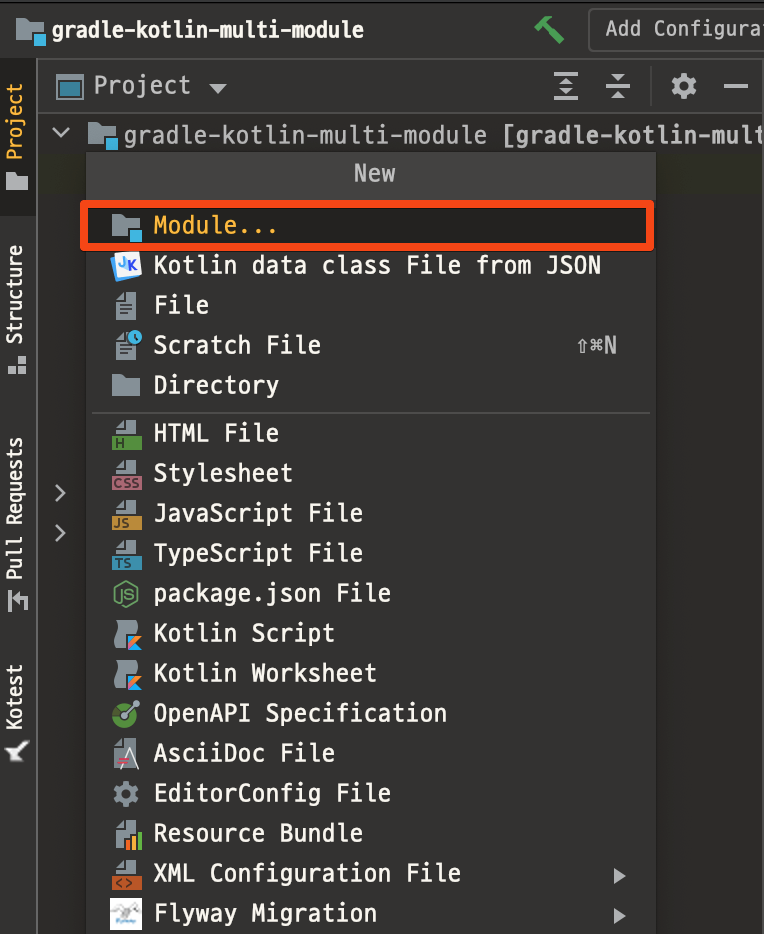
모듈을 만드는 과정은 처음 root 프로젝트를 만들때와 동일하되 ArtifactId는 다르게 지정하자.

잘 따라왔다면 아래와 같이 utils 모듈과 build script가 생성될 것이다.

build script 수정
본격적으로 Multi Module 설정을 위해 build script를 수정해보자.
([root] 는 root 프로젝트, [utils] 는 utils 모듈을 의미한다)
- [root] build.gradle.kts
기본이 되는 build script기 때문에 변경할 부분이 많다.
- AS-IS
plugins { java kotlin("jvm") version "1.5.31" } group = "com.tistory.devs0n" version = "1.0-SNAPSHOT" repositories { mavenCentral() } dependencies { implementation(kotlin("stdlib")) testImplementation("org.junit.jupiter:junit-jupiter-api:5.6.0") testRuntimeOnly("org.junit.jupiter:junit-jupiter-engine") } tasks.getByName<Test>("test") { useJUnitPlatform() } - TO-BE
plugins { java kotlin("jvm") version "1.5.31" } allprojects { group = "com.tistory.devs0n" version = "1.0-SNAPSHOT" repositories { mavenCentral() } } subprojects { apply { plugin("org.jetbrains.kotlin.jvm") } dependencies { implementation(kotlin("stdlib")) testImplementation("org.junit.jupiter:junit-jupiter-api:5.6.0") testRuntimeOnly("org.junit.jupiter:junit-jupiter-engine") } tasks.getByName<Test>("test") { useJUnitPlatform() } }
- AS-IS
- [root] settings.gradle.kt
settings.gradle.kts 에서는 어느 module이 해당 프로젝트에 있는지를 알려줘야하는데 IDE 상에서 처리해줄 것이다.
rootProject.name = "gradle-kotlin-multi-module-app" include("utils")
- [utils] build.gradle.kts
root 프로젝트 build script에서 설정을 했기 때문에 모듈의 build script는 내용이 많이 들어가질 않는다.
- AS-IS
plugins { java kotlin("jvm") version "1.5.31" } group = "com.tistory.devs0n" version = "1.0-SNAPSHOT" repositories { mavenCentral() } dependencies { implementation(kotlin("stdlib")) testImplementation("org.junit.jupiter:junit-jupiter-api:5.6.0") testRuntimeOnly("org.junit.jupiter:junit-jupiter-engine") } tasks.getByName<Test>("test") { useJUnitPlatform() } - TO-BE
description = "utils module" dependencies { }
- AS-IS
app 모듈 추가
utils 모듈을 추가했던 과정과 동일하게 새로운 모듈을 추가한다.
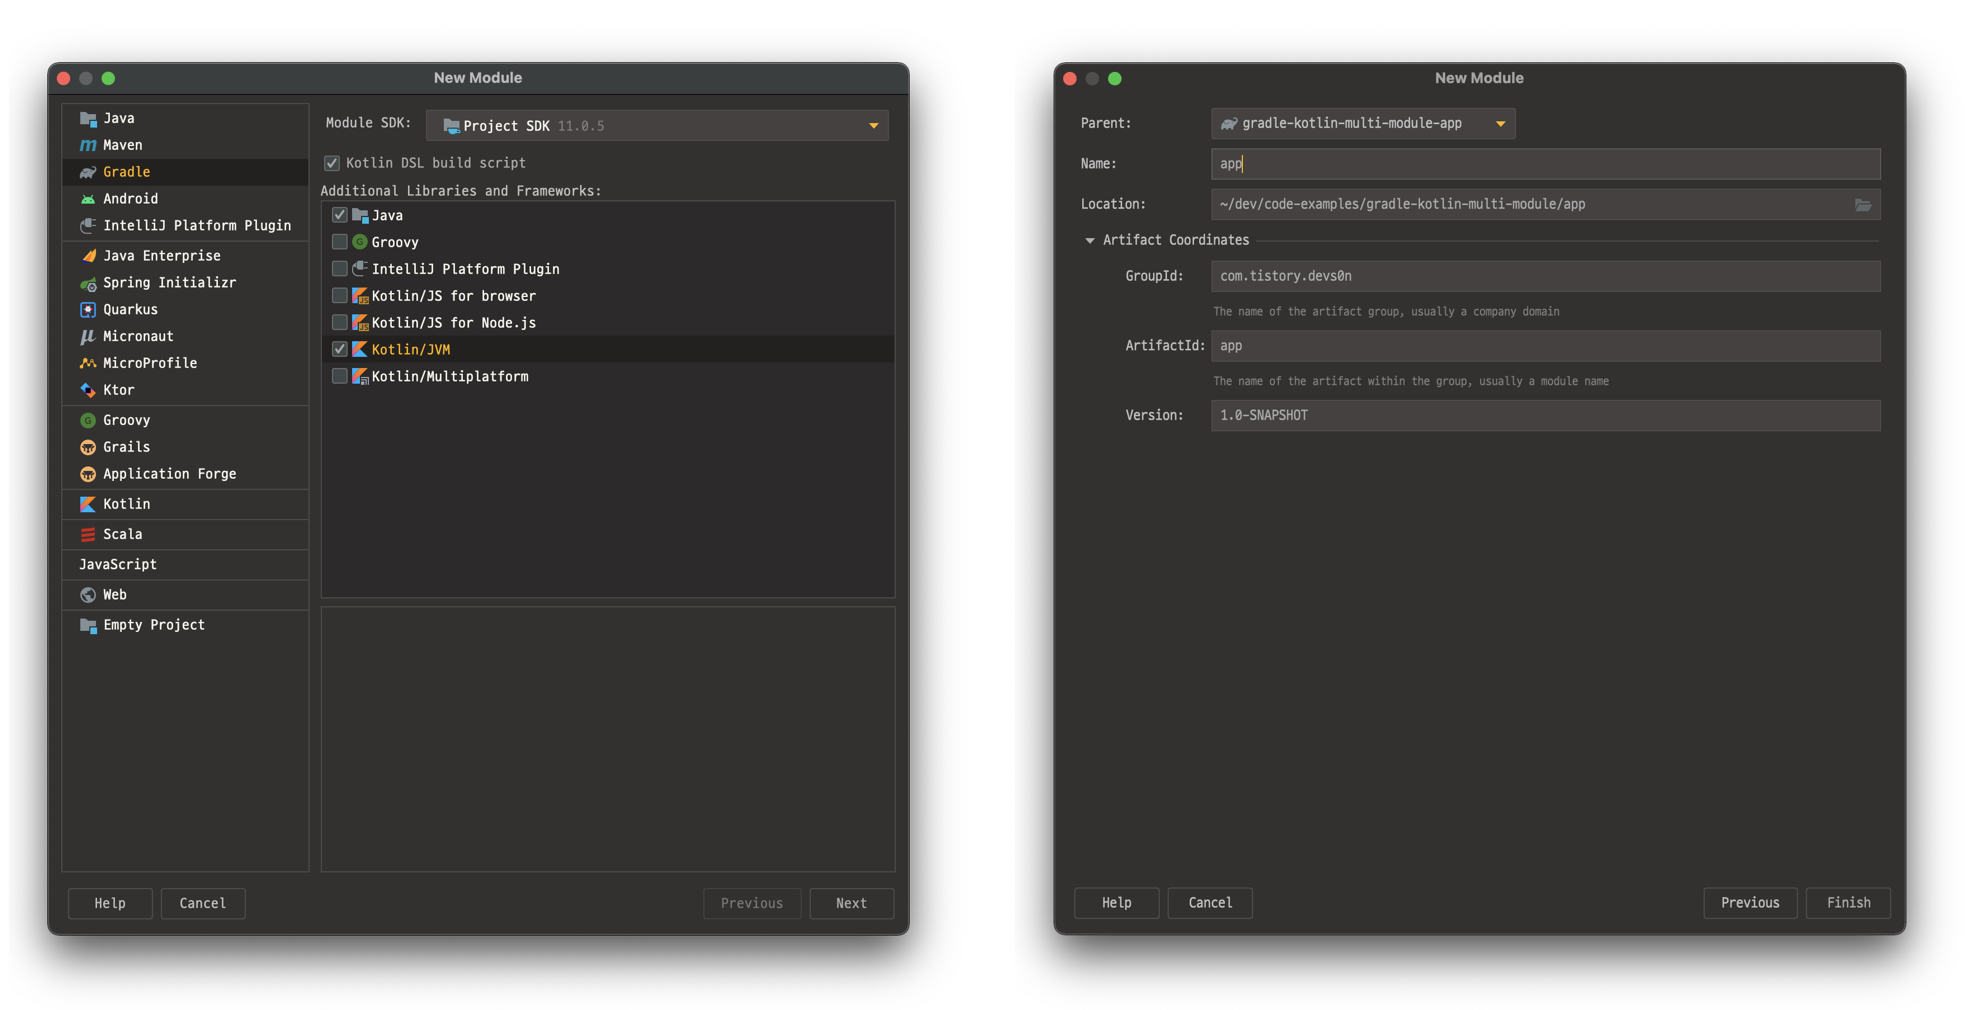
app 모듈 추가후 build.gradle.kts를 수정한다.
이때, app 모듈에서 utils 모듈을 의존하도록 설정한다. (app → utils)
- AS-IS
plugins { java kotlin("jvm") version "1.5.31" } group = "com.tistory.devs0n" version = "1.0-SNAPSHOT" repositories { mavenCentral() } dependencies { implementation(kotlin("stdlib")) testImplementation("org.junit.jupiter:junit-jupiter-api:5.6.0") testRuntimeOnly("org.junit.jupiter:junit-jupiter-engine") } tasks.getByName<Test>("test") { useJUnitPlatform() } - TO-BE
description = "app module" dependencies { api(project(":utils")) } - [root] settings.gradle.kt
IntelliJ IDE를 사용한다면 IDE 상에서 처리해줄 것이다.
rootProject.name = "gradle-kotlin-multi-module-app" include("utils") include("app")
모듈 설정을 마친 후 build를 하면 IntelliJ IDE를 사용하는 경우 Gradle 탭에 아래와 같이 app, utils 모듈이 root 프로젝트 하위에 속해있는 것을 확인할 수 있다.
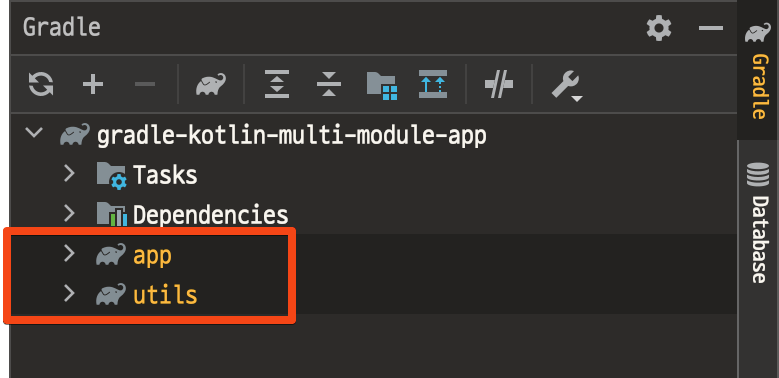
예제 코드 작성
utils 모듈에 app 모듈에서 사용할 수 있는 간단한 유틸리티 코드를 추가해보자.
- [utils] MyStringUtils.kt
package com.tistory.devs0n.utils

infix fun String.isSpaceWithWidth(width: Int): Boolean = (this.length == width) && this.isBlank()

fun String.isNumber(): Boolean = !this.isNotNumber()

fun String.isNotNumber(): Boolean = this.any { !it.isDigit() }
그리고 이제 app 모듈에서 이 유틸리티 코드를 사용하는 코드를 추가해보자.
- [app] AppMain.kt
package com.tistory.devs0n.app

import com.tistory.devs0n.utils.isNotNumber
import com.tistory.devs0n.utils.isNumber
import com.tistory.devs0n.utils.isSpaceWithWidth

fun main() {
    assert("123".isNumber())
    assert("123a".isNotNumber())
    assert("   " isSpaceWithWidth 3)
}
제대로 의존성 설정이 되었다면 app 모듈에서 utils 모듈를 import 하는데 있어 문제가 없을 것이다.
이렇게 Kotlin Gradle Multi Module을 구성하는 방법에 대해 알아보았다.
+ api와 implementation의 차이
Gradle build script에서 의존성을 추가할 때 주로 implementation을 사용하지만, api도 사용할 수 있다.
의존성을 추가하는 기능은 같다고 볼 수 있지만 확연한 차이가 있는데 코드를 통해 이를 알아보도록 하자.
utils 모듈에 의존성 추가
utils 모듈에 apache commons-lang3 dependency를 implementation으로 추가해보자.
description = "utils module"

dependencies {
    implementation("org.apache.commons:commons-lang3:3.12.0")
}
그러면 utils 모듈을 의존받는 모듈들은 이 라이브러리를 사용할 수 있을까?
app 모듈에 이 라이브러리를 사용하려고 시도해보면 사용할 수 없는 것을 확인할 수 있다.
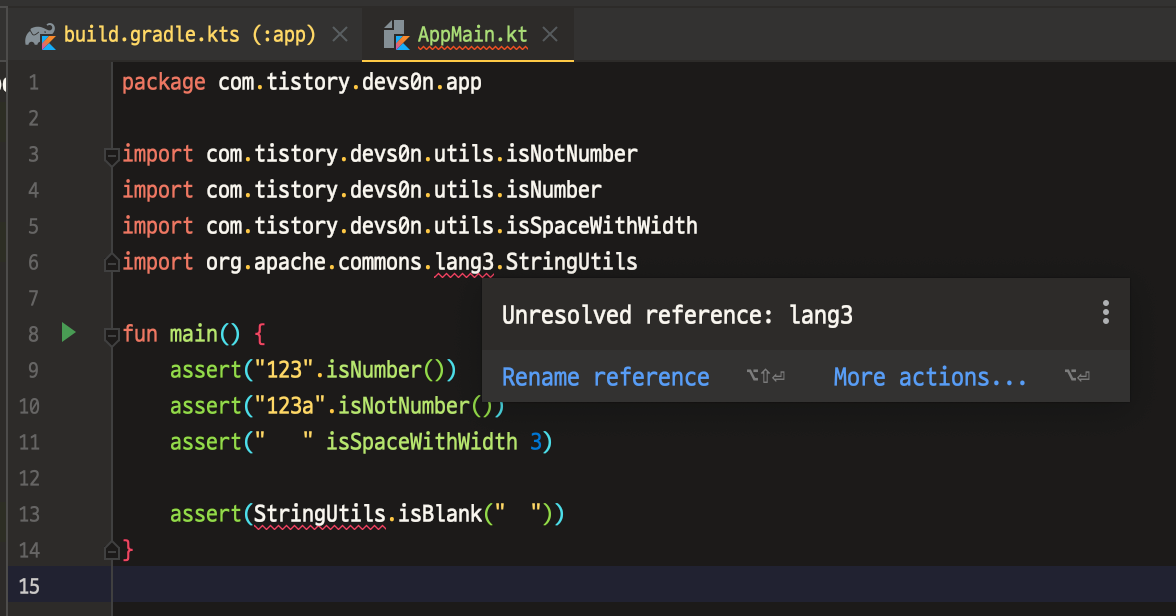
그러면 implementation를 api로 바꾸면 어떻게 될까?
description = "utils module"

dependencies {
    api("org.apache.commons:commons-lang3:3.12.0")
}
아래와 같이 app 모듈에서 commons-lang3 모듈을 사용할 수 있는 것을 확인할 수 있다.
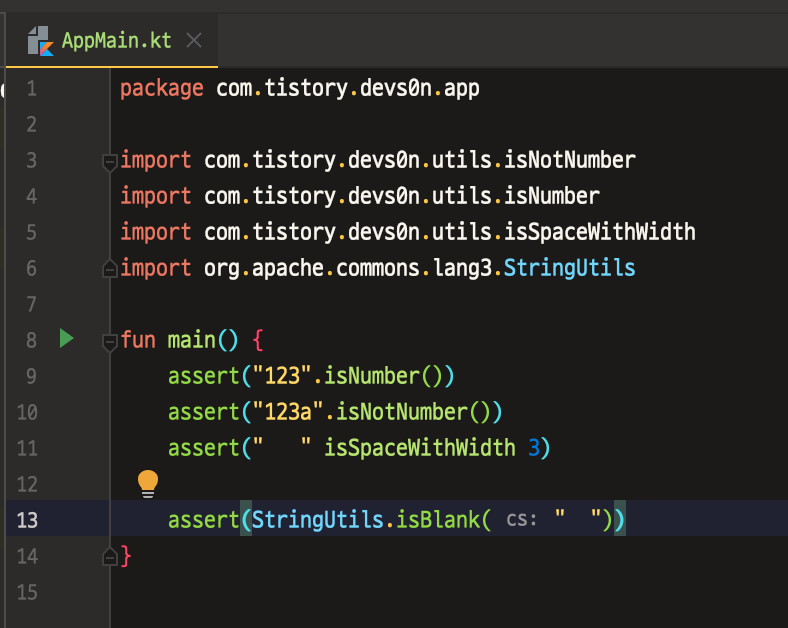
이렇듯 implementation과 api는 의존성 노출과 관련하여 큰 차이점을 보인다.
보다 자세하고 정확한 내용은 Gradle document를 참고하도록 하자.
The Java Library Plugin
The Java Library plugin expands the capabilities of the Java plugin by providing specific knowledge about Java libraries. In particular, a Java library exposes an API to consumers (i.e., other projects using the Java or the Java Library plugin). All the so
docs.gradle.org
'Java & Kotlin > Kotlin' 카테고리의 다른 글
| [MockK] 인자 값 그대로 리턴하기 (0) | 2022.04.14 |
|---|---|
| observable, vetoable를 통한 프로퍼티 변경 감지 (0) | 2021.11.06 |
| by lazy를 통해 지연 초기화 적용하기 (0) | 2021.11.06 |
| by 키워드를 사용한 Delegation (0) | 2021.11.06 |
| JUnit5 테스트 시 @BeforeEach, @AfterEach가 실행되지 않을 때 (0) | 2021.01.10 |


댓글