MongoDB Performance Tips
MongoDB
Explain Query
query를 실행할 때 성능을 위해선 해당 query에 index가 걸리는지 확인하는 것은 중요하다.
index를 생성한 뒤 해당 index를 제대로 타는지 확인하기 위해서 query에 explain()을 추가하여 query를 분석한다.
explain은 query에 대한 자세한 정보를 보여준다.

# index 생성 전
mongo-repl:PRIMARY> db['aggregate-example']
  .find({ type: 'mac' })
  .explain('executionStats');

{
  "queryPlanner" : {
    "plannerVersion" : 1,
    "namespace" : "chris.aggregate-example",
    "indexFilterSet" : false,
    "parsedQuery" : {
      "type" : {
        "$eq" : "mac"
      }
    },
    ...
  "executionStats" : {
    "executionSuccess" : true,
    "nReturned" : 2,
    "executionTimeMillis" : 0,
    "totalKeysExamined" : 0,
    "totalDocsExamined" : 4,
    "executionStages" : {
      "stage" : "COLLSCAN",
      "filter" : {
        "type" : {
          "$eq" : "mac"
        }
      },
      "nReturned" : 2, <=============== returned document: 2
      ...
      "docsExamined" : 4 <=============== scanned documents: 4 = Full Scan
    },
    "allPlansExecution" : [ ]
  },
  ...
}
# `type` index 생성 후
mongo-repl:PRIMARY> db['aggregate-example']
.find({ type: 'mac' })
.explain('executionStats');
{
"queryPlanner" : {
"plannerVersion" : 1,
"namespace" : "chris.aggregate-example",
"indexFilterSet" : false,
"parsedQuery" : {
"type" : {
"$eq" : "mac"
}
},
...,
"winningPlan" : {
...
"indexName" : "type_1", <=============== index
...
},
},
"executionStats" : {
"executionSuccess" : true,
"nReturned" : 2,
"executionTimeMillis" : 0,
"totalKeysExamined" : 2,
"totalDocsExamined" : 2,
"executionStages" : {
"stage" : "FETCH",
"nReturned" : 2, <=============== returned document: 2
...
"docsExamined" : 2, <=============== scanned documents: 2
...
},
...
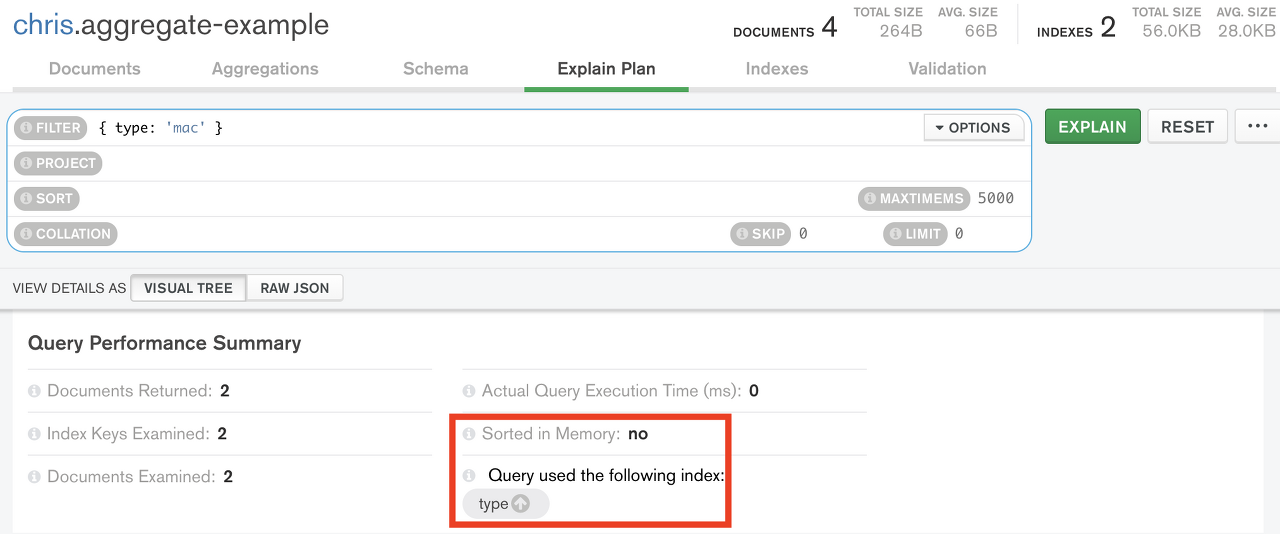
}하지만 단순히 index를 타는지 확인할 경우 Compass의 Explain Plan 사용하는 편이 더 편하다.

조회용 query를 사용할 땐 explain 기능을 사용하여 index를 타는지 유/무를 확인하고 scan 되는 document 수와 return 되는 document의 수를 확인하자.
Profiler
참고: https://docs.mongodb.com/manual/tutorial/manage-the-database-profiler/
Profiler
profiler는 profiling 설정을 하면, 연산(operation)에 대한 데이터를 admin database의 system.profile collection(capped collection)에 쓴다.
- profiling level
- 0 (default): profiler는 아무런 데이터도 모으지 않는다.
- 1: profiler는
slowms보다 오래 걸리는 연산의 데이터를 모은다.- db.setProfilingLevel(1, { slowms: 20 })
- 2: profiler는 모든 연산에 대해 데이터를 모은다.
# Profiling level 설정
mongo-repl:PRIMARY> db.setProfilingLevel(2)

{
  "was" : 0,
  "slowms" : 100,
  "sampleRate" : 1,
  "ok" : 1,
  "$clusterTime" : {
    "clusterTime" : Timestamp(1580204694, 1),
    "signature" : {
      "hash" : BinData(0,"AAAAAAAAAAAAAAAAAAAAAAAAAAA="),
      "keyId" : NumberLong(0)
    }
  },
  "operationTime" : Timestamp(1580204694, 1)
}
# Profiling level 확인
mongo-repl:PRIMARY> db.getProfilingStatus()
{
"was" : 2, <============ current profiling level
"slowms" : 100,
"sampleRate" : 1,
"$clusterTime" : {
"clusterTime" : Timestamp(1580204944, 1),
"signature" : {
"hash" : BinData(0,"AAAAAAAAAAAAAAAAAAAAAAAAAAA="),
"keyId" : NumberLong(0)
}
},
"operationTime" : Timestamp(1580204944, 1)
}# Profiling data 확인
mongo-repl:PRIMARY> db.system.profile.find().pretty()
{
"op" : "query",
"ns" : "chris.aggregate-example",
"command" : { <=============== query 정보
"find" : "aggregate-example",
"filter" : {
"type" : "mac"
},
"lsid" : {
"id" : UUID("dfd3d855-aa42-48e1-99f0-00106e557492")
},
"$clusterTime" : {
"clusterTime" : Timestamp(1580204724, 1),
"signature" : {
"hash" : BinData(0,"AAAAAAAAAAAAAAAAAAAAAAAAAAA="),
"keyId" : NumberLong(0)
}
},
"$db" : "chris"
},
"keysExamined" : 2,
"docsExamined" : 2,
"cursorExhausted" : true,
"numYield" : 0,
"nreturned" : 2,
"queryHash" : "2A1623C7",
"planCacheKey" : "ADC191CC",
"locks" : {
"ReplicationStateTransition" : {
"acquireCount" : {
"w" : NumberLong(1)
}
},
"Global" : {
"acquireCount" : {
"r" : NumberLong(1)
}
},
"Database" : {
"acquireCount" : {
"r" : NumberLong(1)
}
},
"Collection" : {
"acquireCount" : {
"r" : NumberLong(1)
}
},
"Mutex" : {
"acquireCount" : {
"r" : NumberLong(1)
}
}
},
"flowControl" : {
},
"responseLength" : 369,
"protocol" : "op_msg",
"millis" : 0, <=============== query를 수행하는데 드는 시간
"planSummary" : "IXSCAN { type: 1 }",
"execStats" : {
"stage" : "FETCH",
"nReturned" : 2,
"executionTimeMillisEstimate" : 0,
"works" : 3,
"advanced" : 2,
"needTime" : 0,
"needYield" : 0,
"saveState" : 0,
"restoreState" : 0,
"isEOF" : 1,
"docsExamined" : 2,
"alreadyHasObj" : 0,
"inputStage" : {
"stage" : "IXSCAN",
"nReturned" : 2,
"executionTimeMillisEstimate" : 0,
"works" : 3,
"advanced" : 2,
"needTime" : 0,
"needYield" : 0,
"saveState" : 0,
"restoreState" : 0,
"isEOF" : 1,
"keyPattern" : {
"type" : 1
},
"indexName" : "type_1",
"isMultiKey" : false,
"multiKeyPaths" : {
"type" : [ ]
},
"isUnique" : false,
"isSparse" : false,
"isPartial" : false,
"indexVersion" : 2,
"direction" : "forward",
"indexBounds" : {
"type" : [
"[\"mac\", \"mac\"]"
]
},
"keysExamined" : 2,
"seeks" : 1,
"dupsTested" : 0,
"dupsDropped" : 0
}
},
"ts" : ISODate("2020-01-28T09:45:31.083Z"), <=============== query를 수행한 시간
"client" : "127.0.0.1",
"appName" : "MongoDB Shell",
"allUsers" : [ ],
"user" : ""
}Profiling 기능이 활성화되면, 추가 디스크 사용에 대한 영향을 고려해야할 것이다.
Profiler 활용 방법
Profiler를 통해 slow query를 분석할 수 있다.
- MongoDB CLI
# 가장 느린 query를 10개만 가져온다.

db.system.profile
  .find({ op: "query" })
  .sort({ millis: -1 })
  .limit(10)
.pretty();- Compass

Performance tab에서 slow query를 확인할 수 있다.
- MongoDB Atlas

Profiler tab에서 slow query를 확인할 수 있다.
기타 Query 최적화 Tips
참고: https://docs.mongodb.com/manual/tutorial/optimize-query-performance-with-indexes-and-projections/
Network I/O를 줄이기 위해서 조회 시 필요한 특정 property만 가져와라
db.users
  .find(
    { age: { $gt: 20 } }, // filter option: 20 < age
    { username: 1, age: 1 } // project: username과 age만 가져온다.
  );
Network I/O를 줄이기 위해서 조회 결과의 수를 제한하라
db.posts
  .find()
  .sort( { timestamp : -1 } )
  .limit(10); // query 결과 갯수 제한
특정 index를 테스트하기 위해 $hint를 사용해라
참고: https://blog.ull.im/engineering/2019/04/05/mongodb-indexing-strategy.html#hint
쿼리에 특정 index를 사용하도록 하거나 index를 제거해서 테스트하고 싶을 때 hint를 사용한다.

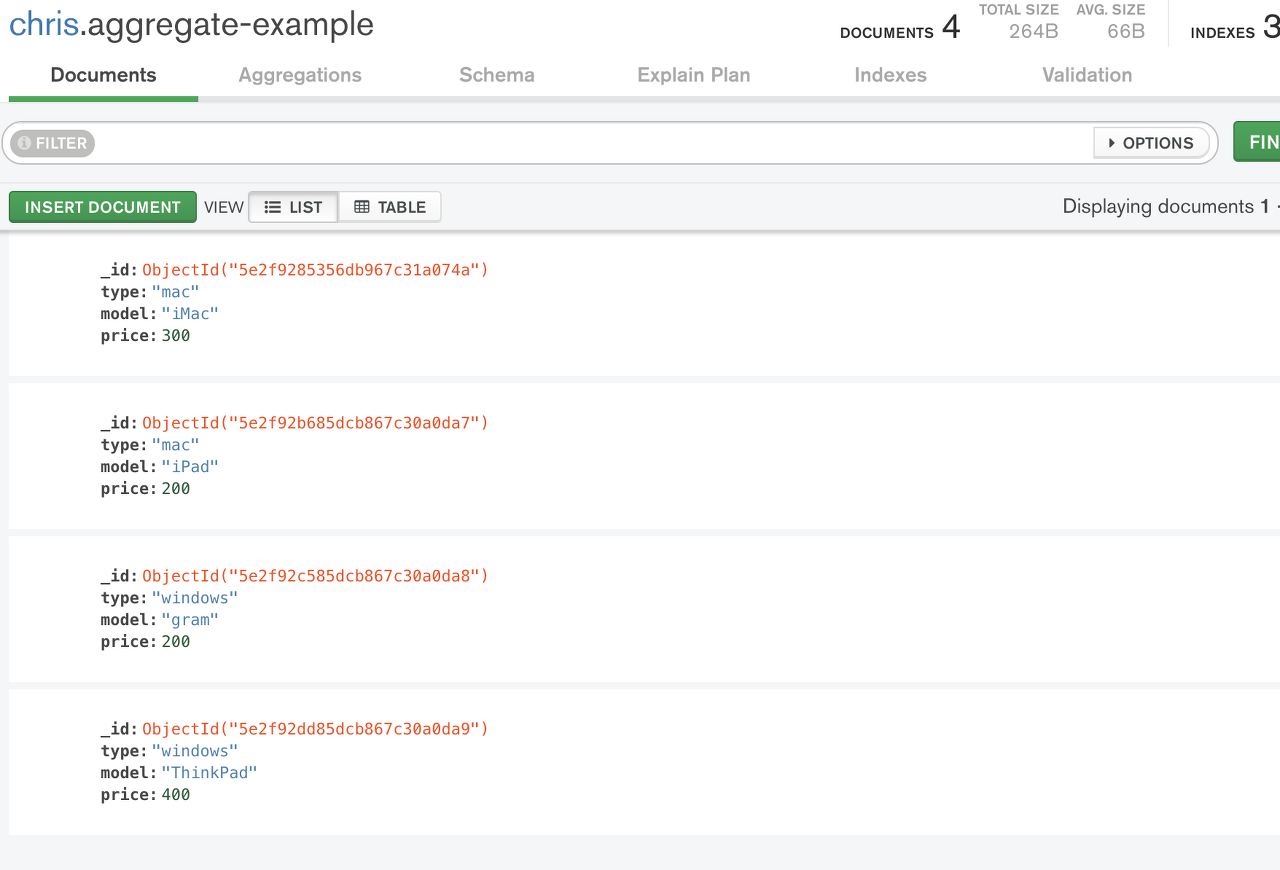
위와 같은 Collection에서

위와 같이 type과 price로 각각 index를 걸었을 때
# type index를 지정
mongo-repl:PRIMARY> db['aggregate-example']
  .find({ type: 'mac' })
  .hint({ type: 1 })
  .explain('executionStats')

{
  "queryPlanner" : {
    "plannerVersion" : 1,
    "namespace" : "chris.aggregate-example",
    "indexFilterSet" : false,
    "parsedQuery" : {
      "type" : {
        "$eq" : "mac"
      }
    },
    ...
  "executionStats" : {
    "executionSuccess" : true,
    "nReturned" : 2,
    "executionTimeMillis" : 0,
    "totalKeysExamined" : 2,
    "totalDocsExamined" : 2,
    "executionStages" : {
      "stage" : "FETCH",
      "nReturned" : 2, <=========== returned documents
      ...
      "docsExamined" : 2, <=========== scanned documents
      ...
      }
    }
  },
  ...
}
# price index를 지정
mongo-repl:PRIMARY> db['aggregate-example']
.find({ type: 'mac' })
.hint({ price: 1 })
.explain('executionStats')
{
"queryPlanner" : {
"plannerVersion" : 1,
"namespace" : "chris.aggregate-example",
"indexFilterSet" : false,
"parsedQuery" : {
"type" : {
"$eq" : "mac"
}
},
...
"executionStats" : {
"executionSuccess" : true,
"nReturned" : 2,
"executionTimeMillis" : 0,
"totalKeysExamined" : 4,
"totalDocsExamined" : 4,
"executionStages" : {
"stage" : "FETCH",
"filter" : {
"type" : {
"$eq" : "mac"
}
},
"nReturned" : 2, <=========== returned documents
...
"docsExamined" : 4, <=========== scanned documents: Full Scan
...
}
},
...
}# query에 index를 안태울 경우
mongo-repl:PRIMARY> db['aggregate-example']
.find({ type: 'mac' })
.hint({ $natural: 1 })
.explain('executionStats')
{
"queryPlanner" : {
"plannerVersion" : 1,
"namespace" : "chris.aggregate-example",
"indexFilterSet" : false,
"parsedQuery" : {
"type" : {
"$eq" : "mac"
}
},
...
"executionStats" : {
"executionSuccess" : true,
"nReturned" : 2,
"executionTimeMillis" : 0,
"totalKeysExamined" : 0,
"totalDocsExamined" : 4,
"executionStages" : {
"stage" : "COLLSCAN",
"filter" : {
"type" : {
"$eq" : "mac"
}
},
"nReturned" : 2, <=========== returned documents
...
"docsExamined" : 4 <=========== scanned documents: Full Scan
}
},
...
}
Aggregate (집계 파이프라인) 성능
Aggregate
MongoDB에서 집계 처리를 할 때 사용하는 framework으로
SQL의 집계 기능(e.g. group by, join, e.t.c...)을 MongoDB에서도 할 수 있게 해준다.

집계 파이프라인의 성능에 중요한 영향을 미칠 수 있는 몇 가지 주요 고려사항
- 파이프라인에서 가능한 한 빨리 도큐먼트의 수와 크기를 줄인다 (using $match)
: 다음 파이프라인 스테이지로 넘어가기 전에 최대한 크기를 줄인다 index는 $match*와 *$sort 작업에서만 사용할 수 있다.- $match 또는 $sort 이외의 연산자를 파이프라인에서 사용한 후에는 인덱스를 사용할 수 없다.
index를 사용하면 대규모 Collection을 선택적으로 검색하고 정렬하는 속도가 크게 빨라질 수 있다.
explain 옵션을 통해 파이프라인 프로세스 세부 정보를 확인할 수 있다.
mongo-repl:PRIMARY> db['aggregate-example'].aggregate([
  {
    $match: {
      type: 'windows'
    }
  },
  {
    $project: {
      model: 1,
      price: 1
    }
  }
], { explain: true })

{
  "stages" : [
    {
      "$cursor" : {
        "query" : {
          "type" : "windows"
        },
        "fields" : {
          "model" : 1,
          "price" : 1,
          "_id" : 1
        },
        "queryPlanner" : {
          "plannerVersion" : 1,
          "namespace" : "chris.aggregate-example",
          "indexFilterSet" : false,
          "parsedQuery" : {
            "type" : {
              "$eq" : "windows"
            }
          },
          "queryHash" : "2A1623C7",
          "planCacheKey" : "2A1623C7",
          "winningPlan" : {
            "stage" : "COLLSCAN",
            "filter" : {
              "type" : {
                "$eq" : "windows"
              }
            },
            "direction" : "forward"
          },
          "rejectedPlans" : [ ]
        }
      }
    },
    {
      "$project" : {
        "_id" : true,
        "price" : true,
        "model" : true
      }
    }
  ],
  "ok" : 1,
  "$clusterTime" : {
    "clusterTime" : Timestamp(1580178952, 1),
    "signature" : {
      "hash" : BinData(0,"AAAAAAAAAAAAAAAAAAAAAAAAAAA="),
      "keyId" : NumberLong(0)
    }
  },
  "operationTime" : Timestamp(1580178952, 1)
}
allowDiskUse option
집계 중간 결과가 너무 큰 경우 (100MB 초과) 집계가 실패하게되는데,
allowDiskUse 옵션을 사용하면 파이프라인의 중간 결과를 디스크에 저장한다.
중간 결과가 너무 큰 경우 allowDiskUse 옵션을 사용해야하지만 파이프라인 속도가 느려질 수 있다.
그래서 allowDiskUse option의 사용을 최대한 피하기 위해, 집계 처리를 할 때는 $match를 사용해서 처리할 Document를 필터링 후,$project를 통해 처리할 필드를 선택하여 중간 파이프라인 크기와 최종 Document 갯수와 크기를 제한하기 위해 노력해야한다.
Aggregate debug

위와 같이 collection에 document가 있을 때
Compass의 Aggregate를 사용하면 다음과 같이 Pipeline stage 별로 결과를 확인할 수 있다.

Aggregate V.S. Map-Reduce
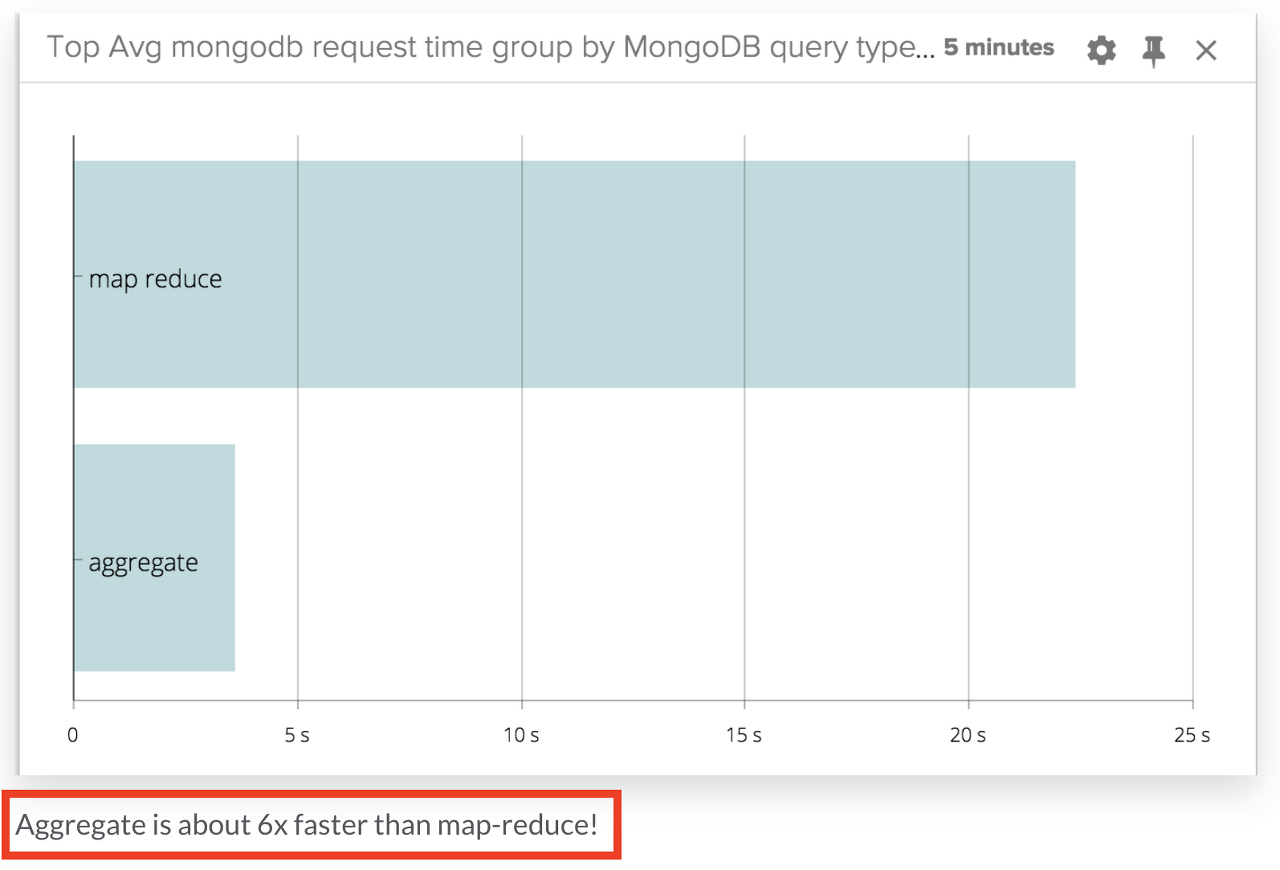
Map-Reduce는 Aggregate와 같이 집계처리를 위한 기능을 제공한다.
하지만 일반적으로 aggregate보다 훨씬 느리기 때문에 쓰지 않는다.

참고: https://sysdig.com/blog/mongodb-showdown-aggregate-vs-map-reduce/
Mongoose
Mongoose?
Mongoose는 Node.js와 MongoDB를 위한 ODM(Object Data Mapping) library이다.
(ORM의 개념을 MongoDB로 옮겨왔다고 생각하면 된다.)
조회만 하는 operation은 lean query를 사용하자
By default, Mongoose queries return an instance of the
Mongoose Document class. Documents are much heavier than vanilla JavaScript objects, because they have a lot of internal state for change tracking. Enabling the lean option tells Mongoose to skip instantiating a full Mongoose document and just give you the POJO.
Mongoose를 통해 query를 실행하면 Mongoose는 내부에서 query 결과인 JSON object를 Mongoose Documents 객체로 변환한다.
이 Documents 객체는 내부 상태 변화를 추적하기 때문에 일반 JSON object 보다 무겁다.
User
  .find({ username: 'Chris' })
  .lean() // <- lean option
  .exec();
lean option을 사용하면 Mongoose Documents가 아닌 plain JSON object를 return 한다.
그렇기 때문에 단순 조회 기능일 경우 lean option을 사용하면 애플리케이션 성능이 더 빨라진다.
(class instance가 아닌 JSON object를 return 하므로 주의)
lean()을 사용하면 사용할 수 없는 것
- Change tracking
- Casting and validation
- Getters and setters
- Virtuals
- save()
=> ODM의 기능을 사용할 수 없다.
DB request를 최소화하라: .populate()를 피하라
하나의 document가 다른 collection의 document를 _id로 참조하고 있을 때
.populate() 보다는 .aggregate()를 사용하라
// users
{
  "_id": "user1",
  "name": "chris",
  "posts": [
    { "_id": "post1" },
    { "_id": "post2" },
    { "_id": "post3" },
    { "_id": "post4" },
  ]
}

// posts
{
  "_id": "post1",
  "title": "post1"
}
{
  "_id": "post2",
  "title": "post2"
}
{
  "_id": "post3",
  "title": "post3"
}
{
  "_id": "post4",
  "title": "post4"
}
user를 조회할 때 해당 유저의 post도 같이 가져오고 싶을 때 populate를 사용하면 _id로 참조하고 있던 posts property가 post object로 치환된다.
const user = await User
  .findOne({ name: 'chris' })
  .populate('posts')
  .exec();

console.log(user);
// user: {
//   "_id": "user1",
//   "name": "chris",
//   "posts": [
//     { "_id": "post1", title: "post1" },
//     { "_id": "post2", title: "post2" },
//     { "_id": "post3", title: "post3" },
//     { "_id": "post4", title: "post4" }
//   ]
// }
하지만 populate는 JOIN query를 통해 조회하는 것이 아니고 property의 _id를 보고 하나하나 조회 query를 날리는 것이기 때문에 비효율적이다.
=> N+1 problem
참고: https://www.zerocho.com/category/MongoDB/post/59a66f8372262500184b5363
DB operations를 병렬로 실행하라
순서대로 처리해야하는 작업이 아니라면 Promise.all을 사용해서 병렬로 처리하자
const [foo, bar] = await Promise.all([
  getUserById('foo'),
  getUserById('bar')
])

foo.changeName('FOO');
bar.changeName('BAR');

// bad
await user.save();
await post.save();

// good
const [user, post] = await Promise.all([user.save(), post.save()]);
Mongoose connection을 재사용하라
새로운 TCP connection은 cost가 높기 때문에,
DB를 사용하는 요청을 처리할 때 마다 DB connection을 생성하고 close하지 말고 만들어진 connection을 재사용하라.
references
- MongoDB
- Mongoose
'DB > MongoDB' 카테고리의 다른 글
| DocumentDB는 MongoDB가 아니다 (0) | 2021.11.25 |
|---|---|
| Local Client에서 접속가능한 Replica Set 구성하기 (with Docker) (4) | 2021.08.09 |
| MongoDB Index (0) | 2021.06.05 |


댓글